Tuesday, August 3, 2010
Stone Soup Quilt Project
For our next Humanitarian project, I've come up with the Stone Soup Quilt Project. It's a combination of my Denim Stars, Fun-and-done, and a rag quilt. Here's a Wikipedia link if you don't know the Stone Soup story. http://en.wikipedia.org/wiki/Stone_soup. Basically, a community brings together scraps of food, and makes a really great soup that is shared with the whole community.
So, this quilt is done with scraps that have been donated. I give each participant squares of flannel, regular cotton fabrics, and batting squares (all pre-cut into squares). They each take a row or two home to sew. When the rows are complete, we will get together and sew the rows into a quilt.
Start with 6" squares of flannel, 4 3/4" squares of regular cotton fabrics, and 4 3/4" squares of thin cotton or cotton/poly batting.
Here are some sizes you may want to use:
Baby (35" X 45") 7 squares X 9 squares = 63 squares
Throw (55" X 70") 11 squares X 14 squares = 154 squares
Twin (70" X 85") 14 squares X 17 squares = 238 squares
Queen (90" X 105") 18 squares X 21 squares = 378 squares
Tuesday, June 8, 2010
T-Joe Covers
 On Scott's T-Joe Pectus Brace, there's a pad on the back that gets sweatty and smelly. So I designed a fabric cover for the pad, so it could be removed and washed. When I showed it to Joe, he wanted all the kids to have these covers. So, this is me with 50 covers pinned to fabric and ready to cut out.
The next picture is a pile of covers that are being assembled.
This is one part of my "Quilted Sunshine" business.
Joe has 7 clinics across the USA where he treats kids with pectus deformities. He keeps me pretty busy.

Sunday, June 6, 2010
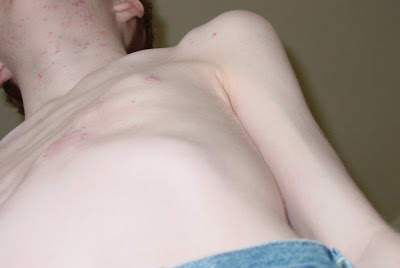
"BEFORE" picture...
 This was Scott's chest, April 2009. He has Pectus Carinatum. He also has/had congenital Scolliosis. For him, that means he had an extra half vertebra in his spine, and an extra bone on his chest.
He had the half vertebra removed, and spinal fusion surgery at Shriner's Hospital, January 2009.
"AFTER" picture...

This is Scott's chest 6 months later. He has worn a T-Joe Pectus Brace for a little over a year. He's almost finished with it, and his chest really looks great!
I need to get a new picture.
Check out the T-Joe Website. "Trainer Joe," is really great to work with, and he really loves the kids.
Subscribe to:
Posts (Atom)


